
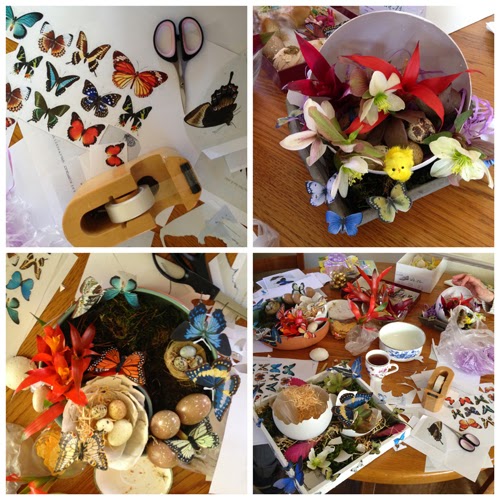
Met de crea-dames gingen we een avontuur aan… een avontuur van gips… Via pinterest hadden we mooie eieren van gips gezien en dachten: “dat willen we ook!”
Dus op naar de bouwmarkt en één van de drie stelde de keuken ter beschikking….
Maar dat viel niet mee…. het duurde vele pogingen voordat we een mooi ei hadden…
Wat tips voor als je het ook wilt proberen:
Doe snelgips in een flesje van glas; doe wat water erbij (niet veel, want je wilt een dik gipspapje, maar niet te dik want je wilt het gieten in een ballon….); schud goed door elkaar (je voelt dat het flesje warm wordt); blaas ondertussen een ballon op; doe het ballon ventiel over het flesje en schud het gips in de ballon; draai het gips rond (hou dat even vol, tot dat het uitgehard is), leg de ballon 15 tot 30 minuten in koud water. En dan komt het moeilijkste gedeelte…. de ballon van het ei krijgen zonder dat het ei breekt…. Daar ging het bij ons vele malen mis….. uiteindelijk was de beste methode om het ventiel eraf te knippen en direct uit te rekken zodat het gat weer dicht is, dan proberen met een schaar de ballon kapot te knippen en snel te verwijderen (door de druk van de ballon gaat het fragiele gips snel stuk).
Van te voren dachten we vele eieren te maken, die we dan opgemaakt konden weggeven…. maar na een middag met heel veel lol, hadden we uiteindelijk net genoeg eierschalen voor ons zelf….

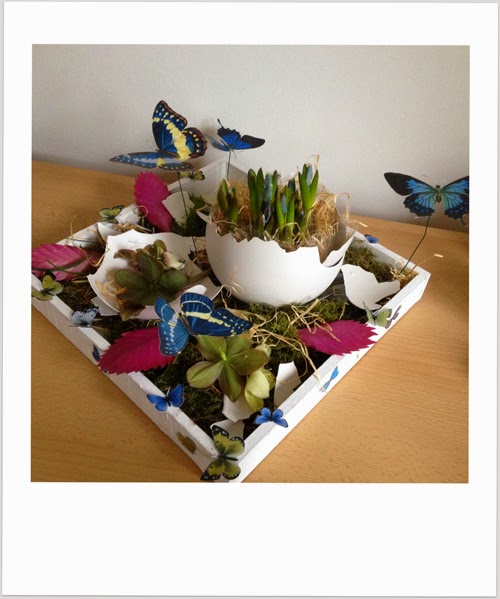
Na een week opdrogen hebben we ze versierd, met droge materialen omdat we het ei niet nat wilde maken. Mos, tropische bloemen en Helleborus bloemen uit de tuin.Op het internet vond ik mooie vlinderafbeeldingen die ik heb geprint. Na wat knipwerk hebben we de vlinders in het stuk verwerkt.
Wat een fleurig resultaat, hè?
—
With the creative ladies we went on an adventure … an adventure with plaster … Via pinterest we saw beautiful eggs made of plaster thought, “we want that too!”
So we went to the hardware store and one of the three ladies gave permission to use her kitchen….
But it was not easy …. it took many attempts before we had a nice egg …
What tips if you want to try it:
Put quickly gypsum/plaster in a bottle of glass; put some water in (not much, because you want a thick gypsum paste, but not too thick because you want to pour it into a balloon ….); mix well (you feel that the bottle is getting hot); Meanwhile blow a balloon; put the balloon valve on the bottle and shake the plaster into the balloon; rotate the plaster around (keep doing that untill it is stiff), put the balloon 15 to 30 minutes in cold water. And then comes the hard part …. getting the balloon of the plaster egg without breaking it…. That went wrong with us many times….. the best way is to cut off the valve and directly stretch it out so that the hole is closed again, then try with a pair of scissors to cut the balloon and quickly removed it (the pressure of the balloon easily cracks the fragile plaster).
In advance we thought to make many eggs, which we could give away to friends and family…. but after an afternoon with a lot of fun, we finally had just enough egg shells for ourselves ….
After a week of drying, we decorated them with dry materials because we did not want to wet the egg. We used moss, tropical flowers and hellebore flowers from the garden.On the internet I found beautiful butterfly pictures, which I printed. After cutting them we used the butterflies into the piece.
What a colorful result, isn’t it?
Het heeft je dan misschien wat moeite gekost (en een hoop lol waarschijnlijk), maar het is wel een prachtig geheel geworden zeg!